Azure Single Sign On Configuration for BCS
This document walks through the needed configuration to enable SSO access for the BCS Application.
This document walks through the needed configuration to enable SSO access for the BCS Application. To fully configure Azure as an Identity Provider (IdP) there will be some additional information that will need to be provided after all BCS configuration has been completed.
1. In Azure click create a new Enterprise Application
2. Click Create your own application

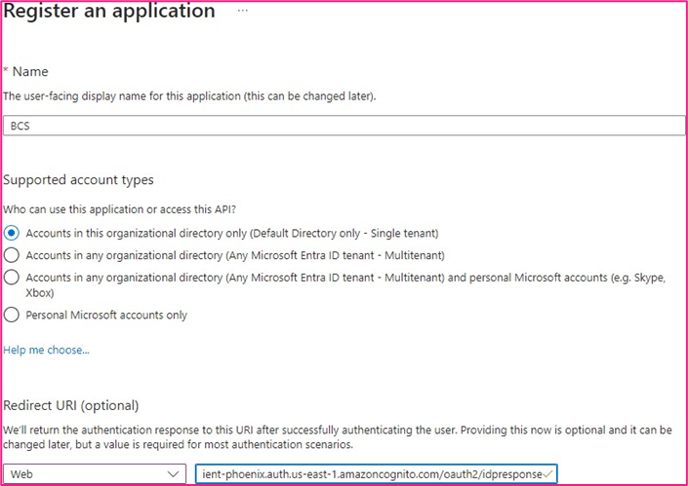
3. Enter the name “BCS” or any name you choose
4. Select the Register an application to integrate with Microsoft Entra ID (App you're developing) radio button
5. Click Create
6. Leave the Supported account types default selection
7. Select Web as the Platform in the dropdown list
8. Enter the BCS redirect URI “https://bcs-phoenix-clients.auth.us-east-1.amazoncognito.com/oauth2/idpresponse” in Redirect URI
9. Click Register
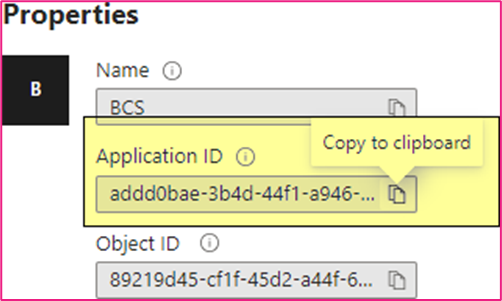
10. Once the new application has been created, note the Application ID.
a. This data will need to be provided to BCS:

11. While in the new application click Single sign-on
12. Click Go to application
13. Click Endpoints
14. Note the OpenID Connect metadata document
a. This data will need to be provided to BCS:

15. Click Client credentials: Add a certificate or secret
16. Click New client secret
17. Enter a description and the expiration date (2 years is the max and recommended)
18. Click Add
19. Note the client secret
a. This data will need to be provided to BCS:

20. The three values noted above will need to be provided to BCS for final The three values are:
-
-
Application (client) Example: addd0bae-3b4d-44f1-a946-98f52f0cf4ad
-
Client Example: Huh8Q~nFbc85cvXuEuLk7-lz3yiG7PdH8PmslbZ.
-
OpenID Connect metadata document. Example: https://login.microsoftonline.com/070863c5-3fad-483a-b397-ce8fd03e1fba/v 2.0/.well-known/openid-configuration
-
21. At this point BCS will need to add Once BCS has been configured a callback URL will be provided. Example:
https://test-client-phoenix.auth.us-east-1.amazoncognito.com/oauth2/authorize?cli ent_id=610db4b2s4a989vunqf42e0uvs&response_type=code&scope=email+openi d&redirect_uri=https%3A%2F%2Fclient.getbcs.com%2Fcallback%2F610db4b2s4a 989vunqf42e0uvs
22. This callback URL can be added as the Home page URL in the
-
-
Example:
-

23. With the Home page URL set users who have the BCS app made available to them can now access their My Apps dashboard and login to BCS. Upon login users will automatically be provisioned.
24. If you wish to upload our logo: