![BCS_Logo_Horizontal_Reverse_CMYK - Copy-1.png]](https://help.getbcs.com/hs-fs/hubfs/BCS_Logo_Horizontal_Reverse_CMYK%20-%20Copy-1.png?height=40&name=BCS_Logo_Horizontal_Reverse_CMYK%20-%20Copy-1.png)
How do you configure Okta as an identity provider (IdP) for BCS?
To configure Okta as an Identity Provider for BCS, create an OIDC app integration in Okta, share three values (Client ID, Client Secret, and OpenID Connect metadata document URL) with BCS, then use the callback URL BCS returns to enable IdP-initiated login. Complete all three phases in order.
To fully configure Okta as an Identity Provider (IdP), complete the steps below and then provide BCS with three values — Client ID, Client Secret, and the OpenID Connect metadata document URL — for final configuration.
- In Okta click on Applications > Applications
- Click Create App Integration
- Select OIDC OpenID Connect
- Select Web Application
- Enter “BCS” (or any preferred name) in App integration name
- Enter the BCS redirect URL
https://bcs-phoenix-clients.auth.us-east-1.amazoncognito.com/oauth2/idpresponsein the Sign-in redirect URIs field (contact BCS support to confirm the current redirect URL for your environment) - Under Assignments you can optionally choose to Skip group assignments for now
- Note: The users added to this application will need to be determined by the
customer performing this configuration
- Note: The users added to this application will need to be determined by the
- Click Save
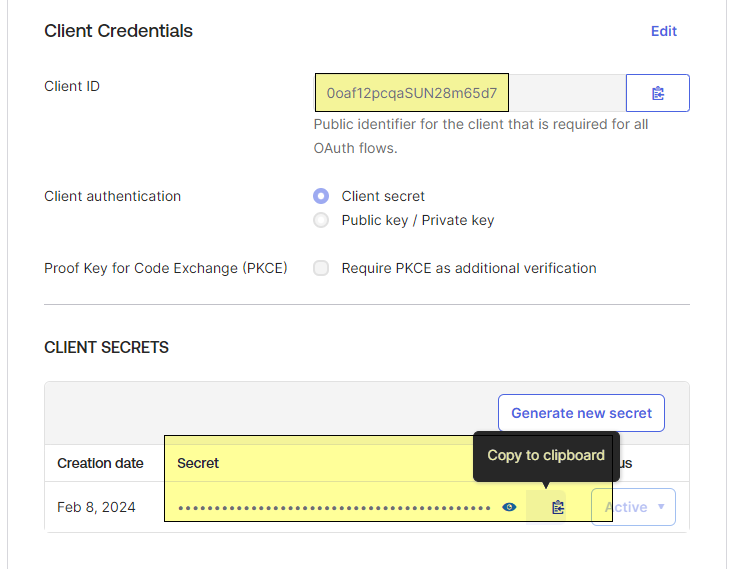
- Note the Client ID and the Client Secret — both will need to be provided to BCS for final configuration
- Example:
- Example:
- Note the Okta well known URI to provide to BCS for final configuration.
- The URI will be in this format:
“YOUR_OKTA_DOMAIN.okta.com/.well-known/openid-configuration”
- The URI will be in this format:
- The three values noted above will need to be provided to BCS for final configuration.The
three values are:- Client ID. Example: 0oaf12pcqaSUN28m65d7
- Client secret. Example:
Xy9sPgdQ_YlJA6F4XC31Vu7DSMySQAblcjYrOcn-qP7n71AqgA-b8vhxARC
WB_E_ - OpenID Connect metadata document. Example:
https://dev-91444013.okta.com/.well-known/openid-configuration
- After providing BCS with the values BCS will need to add configuration. Once BCS has
been configured a callback URL will be provided. Example:https://YOUR-CLIENT-DOMAIN.auth.us-east-1.amazoncognito.com/oauth2/authorize?client_id=YOUR_CLIENT_ID&response_type=code&scope=email+openid&redirect_uri=https%3A%2F%2Fclient.getbcs.com%2Fcallback%2FYOUR_CLIENT_ID - With the callback URL provided from BCS, proceed to the next steps to configure
Identity Provider Initiated (IdP) login- Return to Applications > Applications
- Click the “BCS” application
- On the General tab click Edit in the General Settings section
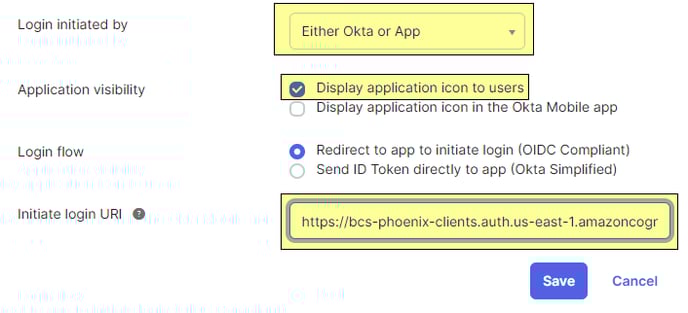
- For Login initiated by drop down choose Either Okta or App
- Check Display application icon to users. Then enter the BCS-provided callback URL in the Initiate login URI field.
- Example:
- Click Save
- Example:
- Assign users to the BCS application as desired and test to ensure they are able to login
successfully